Instructions and Templates
I found so much great stuff on everyone's bio that I thought I would put it all in one place and add some of my own!
Monogrammed Banner
Things you'll need......
6 yards ribbon - I used 1.5". You can used what every you like. Buy this first, then pick you paint to match it, NOT the other way around. Its easier to find paint to match ribbon than ribbon to match paint. I learned it the hard way.
5 yards felt - used for the backing of the banner. I had to do this because mine is hanging on a balcony and light will pass through it. Without a solid backing the paint looked streaky. If it was hanging on a wall I wouldn't have had to do it.
5 feet fabric - used for the from of the banner. I used Party taffeta. It sucked. I had to do 3 coats and it still looked streaky...It may have been the fabric. It may have been that I used metallic paint. It may have had to do with the combination of the two. I suggest buying 1/8 yard of a few different fabric types and testing until you find a fabric you like.
Acrylic paint - You pick the color and the kind. The metallic paint I used was not opaque. I recommend staying away from it.
1 curtain rod - depending on the size of banner you make the length of rod will change. I bought the cheapest one I could fine at Walmart and sprayed it our signature gold color
Note: I always buy way more than I need because I mess up a lot. You may not need quite this much but its what I bought.
First I figured out what I wanted it to look like (shape, size, etc). Mine was pointed on the bottom and about 3 feet 6 inches long and about 3 feet wide. I cut my fabric to the size and shape I needed leaving enough fabric on the top to create an opening for the curtain rod (amount needed will depend on the rod you buy) and a seam allowance of 2 inches ( I suck at sewing. You may not need that much). Next I followed the instruction for an aisle runner on the Road to the Aisle Blog and painted my monogram on the fabric. I just pined the fabric to the enlarged monogram and painted. I found that pencil line showed through my paint. It may not have been an issue had I used opaque, non-metallic paint. When it was dry I sewed it to the felt backing. No special technique used. I didn't flip it inside out or anything I just put it on top and sewed. I flipped the fabric on the top over and sewed it down to make the pocket for the curtain rod and then trimmed off all of the excess fabric around the banner. I used no-sew iron on tape and attached the ribbon to the edges which hid the seam. And that pretty much it. It was a lot of trial and error and alot of taking seams apart and trimming until it was jut right. I also had to redo the ribbon a coupe of times because I couldn't cut a mitered conner that well. If you can paint and sew this should be an easy one but if you can't its going to take a while. I did mine in spurts over a few weeks but you could probably knock it out in a few days if you set your mind to it.
Ostrich Feather and Pearl Garters
To make the garter:
I bought white dupioni silk-like fabric from Joann’s. I picked the width of elastic that worked for me and just measured around my thigh exactly where I wanted it to sit and exactly as tight as I wanted it to be. I cut a strip of fabric @ times the width of the elastic plus 1 inch (ex: elastic is 1.5” wide so my fabric strip is 4” wide) off of the longest side of the fabric. I bought way more than I needed for this project because I was using it for other things too but I would think you could make due with ½ yard. I ironed the fabric in half lengthwise and then using my sewing machine to sew all the way down the edge leaving a 3/8” seem allowance. I trimmed the excess fabric and flipped it right side out. Then I threaded the elastic through the “tube” of fabric and sewed the ends together. I used a hidden stitch to close the ends of the fabric around the elastic.
To make the center:
I bought the ostrich fringe from ebay and sewed it into overlapping circles until the fringe was the fullness I wanted. For the pear center I used glass pearls in varying sizes (don’t know the exact because I bought them mixed from another knottie) and sewed what I could into a flower using felt as a backing and glued the rest in place. I then glued that to ostrich fringe and sew that whole thing to the center seam of the garter.
Our Ceremony
We wrote some of it, we copied some of it, but it is us. Feel free you make it your own.
| _our_wedding_ceremony_for_online.doc |
Water Bottle Label Templates
You will probably have to down load some fonts from dafont.com to use these. They are designed to be used with Nestles pure life water bottles (label width of 1.5") and to use full sheet labels that would be cut after. I actually found plain paper,sealant and double sided tape work better and is cheaper. These are also set up for my printer (Canon Pixma 620) which prints boarderless. I can't claim all of these designs as 100% my own I got alot of inspiration form other knotties but I did spend a lot of time making them my own so if you use them give credit where credit is due!
| water_bottle_9.pptx |
| water_bottle_8.pptx |
| water_bottle_7.pptx |
| water_bottle_6.pptx |
| water_bottle_5.pptx |
| water_bottle_4.pptx |
| water_bottle_3.pptx |
| water_bottle_2.pptx |
| water_bottle_1.pptx |
Pearl Necklace and Braclet
I bought the pearls from Joann’s and the silver clasps from Michael’s. I picked up silk embroidery ribbon for the cord from Hobby Lobby. I found that it is the strongest thing I can find besides wire. For the flower girl I made the Necklace 14” including the clasp and the bracelet 5.5”. For an adult I would make the necklace at least 18”.
To figure out the number of pearls needed I took the length divided by the size of the pearls being used.
Fist I ted the ribbon to ½ of the clasp. Then I strung the pearls on to the silk ribbon using a needle a thread, the ribbon is a bit thick when you double it up so I first threaded a needle with some regular thread and then ties a little loop in the end of the thread. I then put the end of the ribbon through the loop. So the bead would first go on the needle, then go on the thread and than go on the ribbon.
When it was the correct length I tied the end of the ribbon to the other ½ of the claps. Finally I put a drop of superglue on each knot to keep it from coming undone.
DIY Bird Cage Veil
This blog has the BEST instructions I have seen on how to do this!
DIY Basic Veil
I got my bridal illusion tulle from Joann’s. It is 108’ wide. You can make it as full as you want. I used the images at Occansey Designs as a guide for what I wanted.
I used a piece of string to measure how long I wanted the veil to be. I held one end to the pint on my head where the comb would site and then draped the string how the veil would fall. I measured the string and keeping the tulle folded, I cut it to the length I wanted.
Next I laid the tulle folded in half (hot dog style) flat on a dark sheet so I could see what I was doing. I rounded the edges to get the shape I wanted. I found that tulle is really forgiving and if I was a little off you couldn’t notice. Next I unfolded the tulle and trimmed the edges because I had some jagged cuts and one side of the tulle always looks a bit rough to me.
I used my sewing machine and made a running stitch (keeping the tension very loose) as close to the top of the veil a I could. I found that the tighter the tension the longer wider the top of the veil was when gathered. I used the running stitch to gather the tulle to the same width as the comb I had. When I was happy with how the gathers looked, I sewed the top gather again to keep it in place. Then I sewed the veil to the comb.
DIY Veil Beading
Before you start anything PRACTICE on a small piece of tulle! Try out some patterns and get your techniques down before you start the real thing!
Selecting the beads
I would suggest playing around with this. Look for bead that you like in the size you like. I like the look of 2.5mm to 3mm bead but you may want larger beads. Usually the kinds of beads that I have used are as follows:
Seed Beads
Faceted Bicone Beads (Swarovski)
Faceted Rounds Beads (Swarovski)
Bugle Beads
Cut Beads
I would suggest visiting Michael’s, Joann’s, Hobby Lobby, or googleing local bead stores and going to look at them in person. You can also check out www.firemountaingems.comor www.dreamtimecreations.com
I use clear thread (there are 2 kinds. One if stretchy and found with sewing supplies the other has no stretch and is found with beading/embroidery supplies. Either will work. It’s a personal preference).
Once you have your beads and thread selected and a pattern in mind, you need to determine your spacing.
Hand Beaded Veil Instructions 1
For sing bead spaced a particular distance apart (I like my beads spaced at about 1cm).
I suggest marking your spacing on the needle you are going to use (mark from the point of the needle. it can be any kind. I use whatever is around the house). This then tells you when you should come up through the tulle and place your next bead. I use a sharpie to mark the needle but you have to make sure it is dry and it will require reapplying the mark every now and then. I am looking for ways to maybe scratch the surface of the needle instead but for now sharpie works for me.
If you find that sewing right on the edge of the tulle is hard to do, you can sew the beads in about and inch and trim the tulle back. But you have to be careful not to cut the thread.
Now thread your need with clear thread (there are 2 kinds. One if stretchy and found with sewing supplies the other has no stretch and is found with beading/embroidery supplies. Either will work. It’s a personal preference).
Come up through the tulle with the needle and choose your anchoring method. You can choose to tie the end of the thread to the tulle or you can just leave it attached to the spool. There are pros and cons of each. If you tie off the thread you will have multiple anchor point along the veil. I find that unless I’m careful it puts a small pucker in the tulle. If you leave it attached to the spool you can edge the veil with one strand but if it breaks there goes all of you work. If you choose to tie off the thread work with a length that is long enough to cover some distance but is not so long that tangles and knots to easily.
Slide your first bead onto the needle and down the thread until it meets the tulle. Put you needle back through the tulle the same distance down from the bead as it is long. Now using the mark on your needle come back through the tulle where the tulle hits the needle’s mark.
Add you next bead and repeat the process. When you come to the end of your thread anchor it to the tulle and begin again. If you use the spool method, anchor your start point and your end point when finished.
Hand Beaded Veil Instructions 2
Used if you are doing a continuous line or a few bead together.
Using the same anchor in techniques as in “Hand Beaded Veil Instructions 1” Bring your needle up through the tulle where you want the last bead in the pattern to sit. String your first few beads (I won’t do more than 3 small beads you can also do one at a time). Go down through the tulle as close to the end of the first bead as you can. If you are sewing a continuous line/need to add to the pattern, come up through the tulle as close to the last bead as you can. If you are beginning a new pattern, come up where the last bead in the next portion of the pattern should fall. Add beads and repeat.
Hand Beaded Veil Instructions 3
Used if you are doing a continuous line
Using the same anchor in techniques as in “Hand Beaded Veil Instructions 1 and 2” Bring your needle up through the tulle where you want the first bead in the pattern to sit. String your first few beads (I won’t do more than 3 small beads you can also do one at a time). Go down through the tulle as close to the end of the last bead as you can, then come up as close to the first bead as you can. Go through all of the beads again and repeat the process by adding more beads.
Hand Beaded Veil Instructions 4
Used for everything but a continuos beaded edge...then your better off sewing.
Screw using a needle and thread! Just buy E6000 glue, put one layer of the veil on some wax paper, dip the beads in the glue using tweezers and place on the veil. Wait 24hours and remove from the wax paper! Super easy and the bead stay on really well!
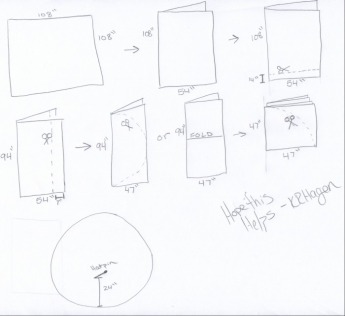
DIY Drop Veil
(instructions are for a 94” long drop veil. 24” long blusher and 70” long veil. adjust lengths and widths as needed.)
Drop veils are nothing but ovals and circles. So, I would use 108" width bridal illusion. I know Joann's sells it for really cheap and you can use a 40% off coupon. You'll need about 3 yards.When you have it, lay it flat and fold it over so that the 108” side is now 54" doubled onto itself. Folding helps so you can keep each side the same and don't have to cut as much.Cut the tulle so that it the appropriate length (24" + 70"....so 94" total).For this veil I would also trim the width (make a circle drop veil). So, now you have a square that is 94" on all 4 sides but it is folded in half. So, you have the fold side that is 94", the opposite side which is 94" and the two other sides which are 47" each.At this point you can do one of two things. Either cut a half circle (I just free hand it. Tulle is incredibly forgiving and if you are a little off, you'll never notice when its on) or you can fold it over again so that you are just looking at cutting a quarter of the circle.Once you have it cut, open it up and lay it flat again. Make any corrections to the cut you will need.Pick your front and measure 24" into the circle. This is where you will put your attachment point. I would suggest a hat pin. You can use a comb but they are harder to hide and when you sew them to the tulle it will cause some puckering. A hat pin or even a bobby pin will allow the tulle to lay fat when you have it on.
Beaded Serving Set and Toasting Flutes
I used 3 and 4mm pearls, size 11/0 beads, cut beads,and seed beads. I got them all from Joann’s. The wire I used came from Wal-Mart. It was a large spool of 24 gauge wire ( I look when I get home). I bought the serving set and champagne glasses from Target.
I wanted a random pattern so I began by mixing all of the beads together in the relative quantities that I wanted them to appear on the wire. Then I began stringing. Actually, I started on one end of the spool and I had FI start on the other end. I randomly strung the beads until my hands hurt. Every now and again I would wrapped the area on the item I wanted to cover to check if I had enough. When I had enough I would make a small loop at the end of the wire with a needle nose pliers and then cut it and make another loop on the other end.
For the glasses: I just began wrapping and when I had the look I was going for I stopped. The wire just stays in place on it’s own. Some times the beads broke as I wrapped but it didn’t matter in the end. If the wire was to long I would just cut it and make another loop.
For the serving set: I Started wrapping from the top of the handle down. This end of the wire just stayed in place on its own. When I got to the end I held the wire with the beads in place and formed the end of the handle. Next I used clear thread to tie the coil together to keep them in place. I started about ¾ down the handle and roped one coil to the next (kind of like a raft made from logs). I did the around the end of the handle and then about 1/3 of the way up. Then I just tied off the end.
DIY Pocketfolds
As far as I can tell Heather is the original creator of many of the DIYs on the knot. I took a lot of inspiration from her. When I was too scared to do something, I thought "Well, she did it, so why can't I!"
DIY Monogramed Aisle Runner
Again, another knottie favorite from The Road to the Aisle blog!
Photo Frame Cardbox
Heather and The Road to the Aisle blog........
DIY Chuppah
2DBRIDE did a really awesome job!
Hand Tied Bouquet
Nice instructions with pictures of how to tie the ribbon.
If I have used any of your photos and you wish to get the proper credit, let me know an I will make sure to give you it.
For questions and concerns email [email protected]
For questions and concerns email [email protected]
